African Flower Blanket ðŸŒ¸

I love crocheting African Flowers – they’re such a pretty design, and I’ve made a whole host of Heidi Bears designs using them – they’re also quick and easy to make in batches. 

My latest blanket is destined for a new baby girl, and they wanted something in pale grey, pink and white – we added in a pale yellow too as I find this design works best with four colours.

I used Paintbox Yarns Simply Aran yarn in Stormy Grey (4 balls), Blush Pink, Banana Cream, and Paper White (1.5 balls of each).

As the blanket is 6×6 squares I made them in batches of 6 at a time, with each group having a different colour combo in the middle/petals. By doing them in batches I managed to get this whole blanket completed in 2 weeks – a good job too as the baby has arrived!


If you’re looking for a good pattern to square off your African Flowers I can recommend this Made in K-Town blog post.

I didn’t get time to measure it before it was collected but it came out roughly 1 metre square and was lovely and cosy due to the Aran thickness.


For the joining I used a flat slip stitch join which have a nice neat finish. I went down a hook size to do the border (I used 5mm for the squares and then a 4.5mm for the border) which was made up of a row of double crochet (sc if you’re using US terms) but making htr’s (hdc) into the point where the squares join. I then followed this with a round of htr in the back loops only, of white, then yellow, then pink.

Anyway here’s hoping it is very loved in its new home, and keeps baby V all warm and snuggly….

Christmas C2C Crochet Blanket

A few weeks ago the most adorable pictures started popping up on my Instagram feed.  The very talented Sarah aka Repeat Crafter Me started releasing the patterns for her Christmas Character Afghan and while I managed to resist for a couple of weeks, I just knew I had to try out some of the squares she had written. 

I’ve made C2C blankets before but only in single colours or stripes so this was my first time making a ‘graphgan’.  Quite a few people have been asking what yarn I used and for tips on the colour changes.  I used multiple small balls for the different colours so I didn’t have to carry the yarn through too much. For some instances I did – if it was just once pixel of a colour before reverting to the other colour it’s easier to just crochet over your second colour.

  
I used Stylecraft Special DK yarn for all my squares – it’s DK thickness, and I used a 3.5mm hook.  I also did the traditional C2C method using DC (US terms, or TR in UK terms) rather than the modified version Sarah (Repeat Crafter Me) recommended. She was however using Aran yarn so as mine was thinner I opted for the normal stitch.

Here are the squares I made and the Stylecraft Special DK shades needed:

  Santa: Matador, White, Silver, Black

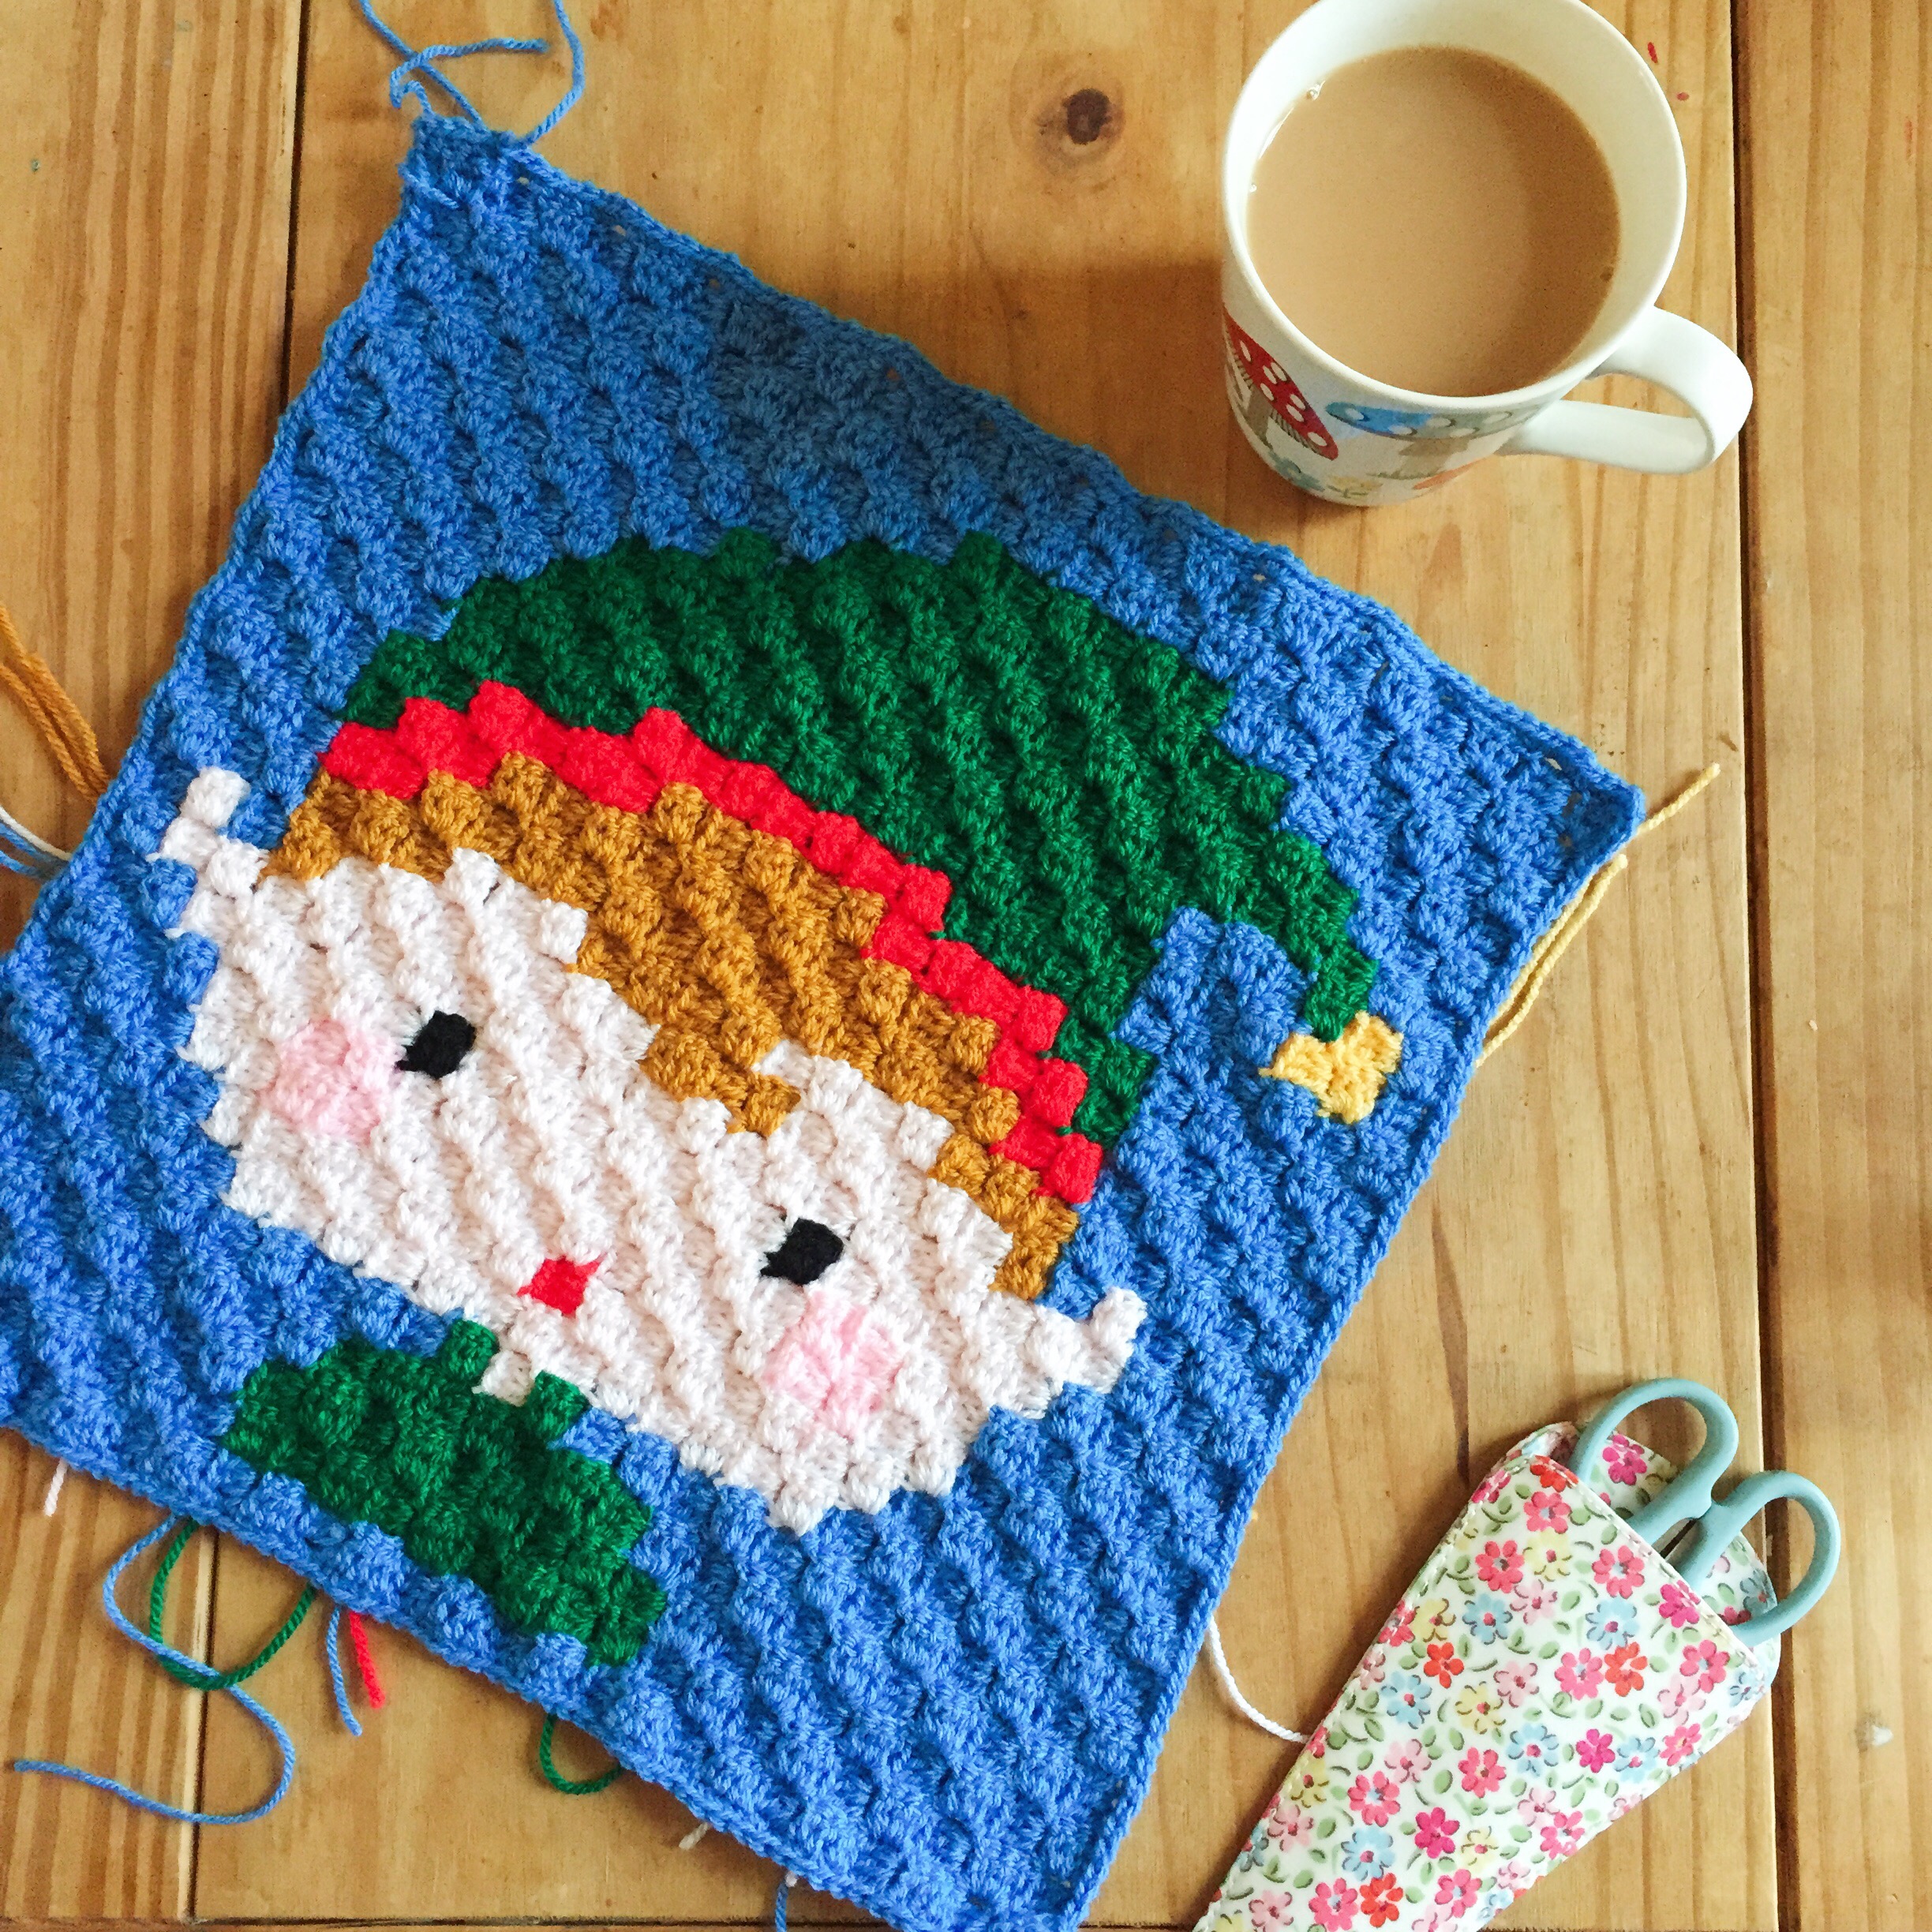
  Elf: Aster, Green, Matador, Gold, Soft Peach, Fondant and Black

  Snowman: Cloud blue, White, Black, Matador, Green and Spice

  Gingerbread Man: Matador, Walnut, Gold, White, Black and Green

  Rudolph: Sunshine, Walnut, Mocha, Gold, Matador. Black and White

  Sleigh: Sherbert, Matador, Sunshine, Green, White and Black

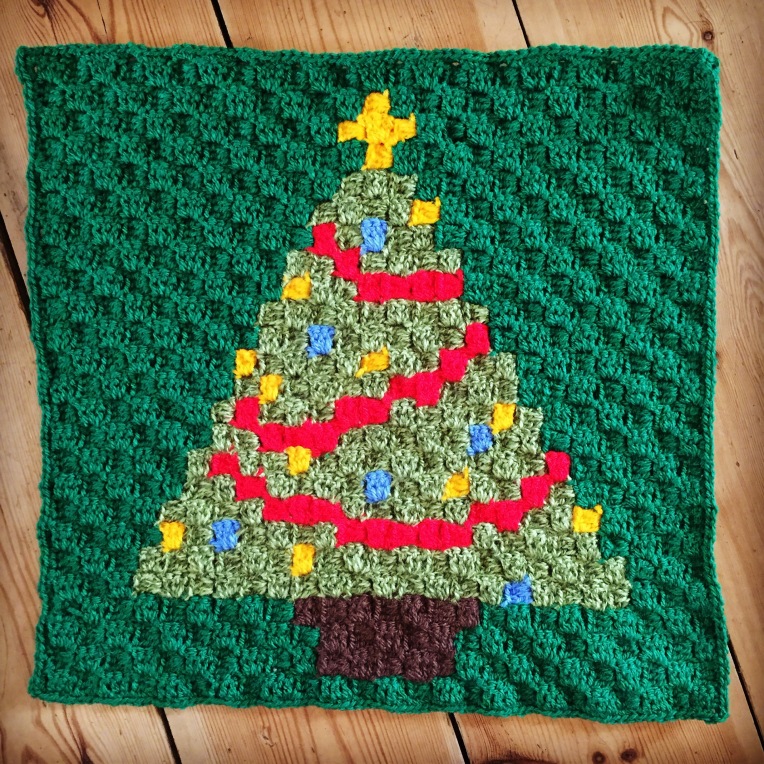
  Christmas Tree: Green, Greengage (a variegated yarn), Sunshine, Aster, Matador and Brown


Stocking: Silver, Matador, White, Green, Fondant, Claret, Aster, Sherbert and Sunshine

  Christmas Pudding: this square was designed as an alternative by Elemelo Crafts – Repeat Crafter Me designed a wreath but I already had the Christmas tree square which was very green so I chose the Christmas pudding (it’s hubby’s favourite!). Other alternatives are on RCM’s blog.  Colours for this one are: Turquoise, Brown, Matador, Green and White.  I also added in some black pixels at random to make it look like raisins in the pudding.

As suggested on Sarah’s blog I did a SC edge around each square which made joining them easier. Just when I thought the pattern couldn’t get cuter, Sarah released a header and footer banner pattern to top and tail the blanket.  Here are the pics of mine made up:


Yarn: White, Matador, Meadow, Turquoise, Sunshine and Black.

I can’t tell you quantities of yarn used as I was using up my stash but White, Matador and Green were the shades used most, and I didn’t use more than 3 balls of White and 2 balls of Matador.

Joining:

I chose to crochet my squares together – wrong sides facing each other and SC along the edge.  This gives a raised ridge join which I liked for this design.  I did this for all the squares and then to join the header and footer.  To make sure I evenly spaced the header and footer I found it helpful to use stitch markers to hold the pieces together (in theory you should have the same number of SC on both but in practice it’s tricky adding SC to C2C blocks).


Border:

As if the blanket wasn’t festive enough I decided to add a Candy Cane effect border! Firstly I did a round of White SC around the outside of the blanket, followed by a round of Green HDC to make the colours pop.  Then onto the Candy Cane border – I’d seen this method on Pinterest ages ago and after a bit of searching found these instructions here.  I just changed the colours to White and Matador – and also added 2 extra chains to the corner spaces to stop it curling up.  This border did make the edges of my blanket ruffle a bit (might be worth trying it with 3ch instead of 4?) but blocking sorted most of this out.


And Voila! Here’s my finished blanket! Pip loves it and I can’t wait for her to curl up under it at Christmas and we can watch movies together.  It’s bigger than I anticipated ( 46″x56″ ) so it’ll easily cover her bed, which is perfect for Christmas Eve!

   
 A big thank you to Sarah aka Repeat Crafter Me for designing such a brilliantly fun and festive pattern – this is going to be a Christmas heirloom in our house!x

Hello Deer – a super cute baby blanket using tapestry crochet

This project has been ongoing for a while.  I first fell in love with the Hello Deer Baby Blanket pattern by Little Doolally when I saw my lovely Instagram friend @littlecosythings (if you haven’t already followed her, you should – she’s so talented!) making one.  I’d been itching to try tapestry crochet but hadn’t found a project which captured my imagination until spotting this one – it’s just adorable! My best friend had recently announced her second pregnancy so I decided this would be the perfect new baby gift.

I opted to use Caron Simply Soft yarn for the blanket – it’s Aran weight as recommended in the pattern but also hard wearing and I love their colour range.  I used the following:

Chartreuse (green), Chocolate for the body, Light Country Blue for the main background colour, and small amounts of Off White and Victorian Rose.  I also used some DK yarn for the nose, eyes and flower.

The chart in Little Doolally’s pattern is great and really easy to read and it was definitely one of those projects I couldn’t put down!


A few people have asked me to share how I did the fabric backing for this so here are my thoughts…though I think it would vary depending on the project and weight of yarn etc.

This pattern involved stranding the yarn across the back of the work as you work with the different colours – you can’t crochet over them as there’s often 2-3 colours in a row and it would  end up being very thick and uneven in places.  So while stranding is the best solution, the result is the wrong-side of the blanket needs covering – hence the fabric backing.

I’d been holding off doing this bit until I found out what my friend was having – and she had a little boy! So I opted for a white cotton fabric with blue stars.  There are instructions included in Little Doolally’s pdf and I don’t want to give away her pattern but you need to fold over a hem and iron some sharp corners before pinning the fabric into place.  I made mine bigger than recommended as I wanted it to sit closer to the border.  I used a simple hand sewing stitch (technically overcast stitch) to attach it.  Make sure you don’t pull the fabric taut – it will cause the blanket to pucker on the other side! I made this mistake and had to re-do it! Make sure the blanket and fabric are both lying flat when you’re pinning it into place.

Edit

I’ve used cotton but you could use flannel or fleece if you wanted – this blanket was quite thick already so I didn’t want to add bulk, which is why the cotton is perfect.  I also pre-washed it to avoid future shrinkage.

And below is the finished blanket! It measures 22.5″x 19.5″ – the perfect size for a pram blanket or it could be used as a little playmat!


Painted Roses Blanket

I have a crazily long list of crochet things I want to make and this Painted Roses blanket has been on it ever since I spotted a picture while browsing on Pinterest.

The pattern is by super-talented Sandra Cherry Heart and is truly beautiful. I decided to make a toddler-bed sized blanket for when Pip moves out of her cot (poor child will be drowning in blankets I’ve made for her by the time she’s a teenager!) and handily Sandra had included instructions for how many rose squares to make for different size blankets.

Caron Simply Soft yarn was my first choice for the blanket rather than the Stylecraft dk suggested as I wanted it a bit thicker, and the Caron yarn is lovely and soft. The shades I used were
– Lemonade (yellow)
– Strawberry (pink)
– Autumn Red
– Berry Blue
– Duck Egg

IMG_0715

The squares themselves aren’t the quickest to make so this has taken me a while! They’re also quite solid once made which means the blanket is thick and cosy.

IMG_0615

Once I’d made 40 (5×8) I joined them with Berry Blue yarn – this is darker than the Sky colour suggested but I think it works really well with the duck egg and makes the colours pop! The border pattern was really well written and gave a really flat, neat edge, and the ‘leaf’ final round finished it off perfectly.

I’m so happy with this blanket, it has to rate as one of the prettiest things I’ve ever made! And Pip has already told me she likes the colours and flowers so I hope she’ll treasure this as she grows up x

IMG_0788

IMG_0787

IMG_0724

IMG_0789

IMG_0791

‘Something Blue’ Crochet Wedding Blanket

I’m a huge fan of blankets – you can never have too many! When my husband and I got married 3 years ago one of our friends made us a beautiful patchwork knitted blanket and it is one of my favourite gifts. So when two of our closest friends (who are two of Pip’s godparents) got engaged last year I began to think about maybe making them a wedding present.

Of course I didn’t actually get my butt in gear until this summer when it dawned on me I should get a wriggle on!

After suggesting it to the bride and groom who were very excited about it, I decided to do it in shades of blue – blue being the bride’s favourite colour and also quite fitting as ‘something blue’ for the wedding!

I’m a long time user of Stylecraft DK – its easy to work with, has a great range of colours and is very affordable – which when you’re making a huge blanket is important! I decided to use the seven Stylecraft blues: Aster, Cloud Blue, Sherbert, Midnight, Royal, Denim and Turquoise.

Having decided on a colour scheme the next part was deciding on a block motif to use. Jan Eaton’s 200 Crochet Blocks book is an amazing read and source of inspiration. The one that really stuck out for me is the Willow Block. In the book its multicoloured but I opted for a solid colour, and set about making the blocks in the seven colours.
IMG_7313.JPG

IMG_7604.JPG

The pattern is easy to use, though I would have quite liked a diagram version in the book. It is quite an intricate block though, and even with lots of practice it still took about half an hour to make each square! At some point it dawned on me that I’d need to add another block which was simpler and quicker if I was going to get this finished in time. The Lacy Cross block (again from Jan Eaton’s book) was the perfect choice – simple, but that provided a good contrast with the delicate willow squares.

IMG_7983.JPG

So I didn’t go completely crazy I split the blanket into quarters and once I had 35 squares I would join them, which provided a nice change and also helped me visualise what the end blanket would look like. To join them I put the blocks wrong sides facing and joined with single crochet in white.

IMG_8094.JPG

140 squares later (14×10) and 4 months later, I have finally finished this blanket! Once all the squares were joined I added a simple border of white HDC, grey DC, white HDC and then a HDC round in bright yellow (Stylecraft DK Sunshine). Yellow is the groom’s favourite colour and together with blue and grey it is the colour scheme of their Scottish wedding. The thin yellow band around the outside adds a great pop of colour – I love it! And I managed to finish with 3 weeks to spare! Fingers crossed the future Mr & Mrs Miles love it as much as I do 🙂

IMG_8431.JPG

IMG_8426.JPG

IMG_8424.JPG

IMG_0563.JPG

IMG_0562.JPG

With the border the blanket measures 74″x52″ (using a 3.5mm hook)

V-stitch LoVe

After seeing all the amazing V-stitch blankets on Instagram, I finally caved and made one of my own. A big inspiration was the Patchwork Heart and she’s got a guide to the stitch on her site – my blanket used a foundation chain of 132 and turned out the perfect size for a pram blanket (or todder size if you have a rather petite child like me!).

I also thought it would be a good opportunity to try out the Caron Simply Soft yarn I’d been hearing about lately and I wasn’t disappointed. It’s acrylic but unbelievably soft and I’m a fan of the large ball size (170g). I love jewel colours so I picked: Grape, Blue Mint, Passion, Fuschia and Berry Blue.

IMG_7622.JPG

V-stitch is so easy once the first row is completed and works up incredibly quickly. I took it to Cornwall and it was the perfect holiday project.

IMG_7564.JPG

The whole thing was completed in a couple of weeks (probably because it was so addictive), and I finished it with a border of SC in Grape, followed by a HDC round in Blue Mint.

I haven’t decided yet whether to keep it (tempting but running out of space), gift it or sell it, so it’ll just have to sit looking pretty for a while.

IMG_7638.JPG

IMG_7646.JPG

IMG_7644.JPG

IMG_7649.JPG