Sashiko stitching with Craftiosity

After I finished university I went and taught English in Japan for six months – I totally fell in love with the country and the culture. Sashiko has been on my (very long) list of crafts I’ve wanted to try ever since I lived in Japan but I found it a bit daunting to undertake by myself…

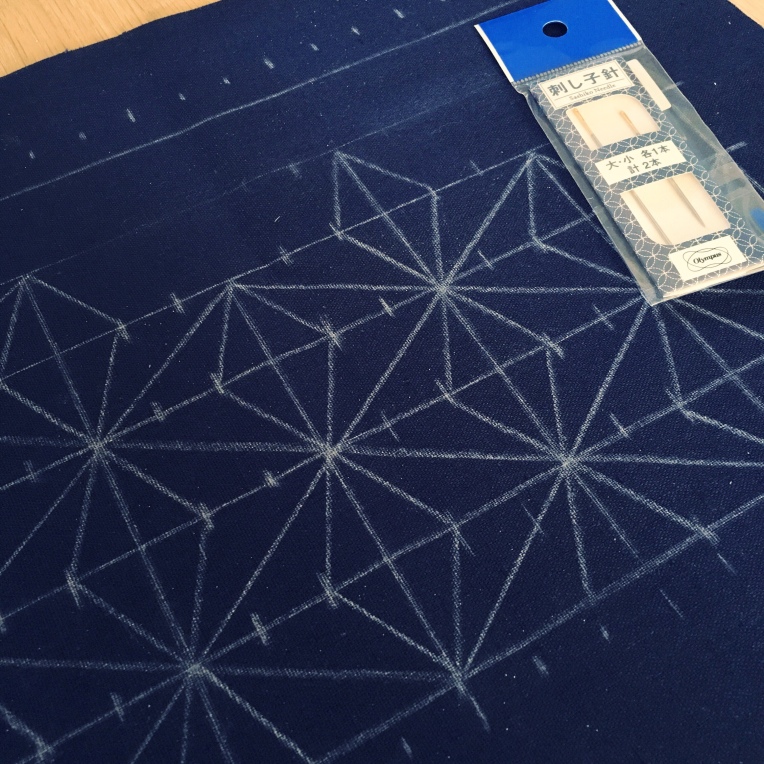
So when the lovely Moira from Craftiosity asked if I’d like to review one of her craft boxes I jumped at the chance to try sashiko. Each month they design a box around a new craft and inside the box is everything you need to complete the project. The sashiko box included indigo cotton to make two placemats, as well as authentic sashiko needles, sashiko thread, tailor’s chalk, a pattern, full colour instructions and a pretty greeting card.

Sashiko involves marking the pattern onto the fabric with chalk before you begin, and the geometric pattern was really easy to follow and mark up. The colour instructions are brilliant but if you need further guidance Moira also puts together video tutorials for all the boxes in case you get stuck. Once the pattern is marked on you can start stitching – sashiko differs from normal embroidery by holding multiple stitches on your needle at once, hence the longer needle. This also helps you get them even in size and is incredibly satisfying to do. It was definitely one of those of projects you don’t want to put down!

What I really love about the boxes is that the projects are beautifully designed and will look amazing in your home, but also that the kit includes proper tools that will enable you to pursue the craft as a hobby if you want to carry on. The needles are fantastic (and I doubt you could pick them up in a normal craft shop) and there’s advice about what fabric to choose if you want to make more sashiko projects.

I’d bought my first Craftiosity box the previous month and tried my hand at copper embossing which was awesome! Here’s a pic of the copper embossed lid I made for the wooden box (which was also included)!

For disclosure I bought the copper embossing box myself, Moira kindly sent me the sashiko box to review, and I have since bought myself the July box so I can try cyanotype printing 💙

If you’d like to try a Craftiosity box you can enter HOLLYPIPS at the checkout and get free postage! The August box is going to be macrame so order before the end of the month so you don’t miss out ☺️

Happy crafting everyone!

Cedar Rivers Baby Blanket

I realised I haven’t shared any photos of my latest finished blanket! June was spent busily making this baby blanket for one of my gorgeous friends who is expecting her second baby, and as we had a girls weekend at a spa planned I wanted to finish it before then so I could give it to her in person.

We’d chatted about colour schemes and as she wasn’t finding out if baby is a girl or boy she wanted some neutral colours, so we opted for a cool green, grey, yellow and navy along with white. Yarn was Stylecraft DK in White, Aspen, Grey Citron. Struggled to find a navy yarn I was happy with it, most were almost black, but I ended up finding Sirdar Snuggly DK (shade 0224) in my local yarn shop which was just the right shade.

I’ve made a Cedar Rivers blanket before for my sister in law and my friend loved this geometric design.  I figured I’d need 30 squares (5×6) to make this a good size for a cot, and with each square taking an hour or so including sewing in ends, the pressure was on!

Thankfully I made it in time, and once the squares were all made joining was a pretty quick process. I like to slip stitch them together (wrong sides together) along one way, and then the other way. This gives a neat, slightly raised join.

For the border I first did a round of double crochet (UK terms), then half-treble rounds in yellow, green and grey, finishing with a final dc round in grey. The finished dimensions of the blanket including the border were 94x112cm, without the border 87x106cm, and each square was 17cm square, this was using a 4mm hook. This is mainly for my reference in case I make another but through some of you might find it useful 😉

So now this blanket is in it’s new home….we just need baby to arrive!

Xx

Printing memories

I’m very sentimental at heart…maybe that’s why I take so many photos, the children are growing so quickly I want to remember all these little moments. But like a lot of people these days the photos tend to stay on my phone. So when the lovely Kate from Squared.one got in touch to see if I’d like to review their fridge magnets I jumped at the chance. I had a few made when Pip was little but hadn’t got round to ordering any since so my fridge was missing photos of Milo – this was a great chance to rectify that!

This has been a busy year – Pip has started school so I ordered magnets of her first day, world book day and other little milestones for her.

We had a lovely holiday in Cornwall, visiting the Eden Project, going to the beach and aquarium and Milo had his first pony ride.

I ordered some lovely ones of Milo on his birthday, cooking and smiling (that had to be printed because it’s rare that I persuade him to smile at a camera!).

And we had a couple of fantastic snow days – the first time both children had seen proper snow – these are the memories I want to capture and have on display, and now I get to see them on my fridge and it makes me smile every time.

Squared.one have the option to have both square and round fridge magnets which I really like, and being 7cm in diameter they’re big enough that you can see the photo properly. They also have a lovely glossy finish and the printed colours are true to my original photos. The website is very easy to use – so easy that I could order them on my phone with one hand while feeding Milo with the other! If you want to order some here is the link.

[Disclaimer – I received a voucher to order magnets for the purposes of this review #gifted ]

Easy Crochet Basket Pattern

I love making crochet baskets – they’re incredibly versatile and quick and easy to make. I recently taught a class on hot to crochet a basket and thought I’d share the pattern on my blog too…so here it is!

You Will Need:

T-shirt yarn (approx 240g)

10mm crochet hook

Needle (for sewing in ends)

Stitch marker

How to make the basket:

Round 1: Using the t-shirt yarn, form a magic ring, 6dc into the ring and tighten (6)

Round 2: 2dc in each stitch (place a stitch marker into your first stitch, and for every round) (12)

Round 3: 1dc into first stitch, 2dc into the next stitch *dc, 2dc* until end of the round (18)

Round 4: 2dc into first stitch, dc into the next two stitches *2dc, dc, dc* until end of round (24)

Round 5: *2dc, dc into next 3 stitches* (30)

Round 6: dc in back loops only for the whole round (30)

Rounds 7-10: dc in every stitch (30) (Nb this is 4 rounds)

Round 11: dc in first 5 stitches, ch8, skip 5 stitches from previous round, dc into the next stitch and the following 9 stitches. Ch8, skip 5 stitches, dc into the last 5 stitches. (36)

Round 12: dc in every stitch, when you get to the chain sections, dc 8 over the chain and then continue with the dc until the end. (36)

Finish off and weave in ends
Ta-dah that’s it! These make great little gift baskets or storage solutions – happy crocheting!x

Easter petal basket pattern

I love crochet baskets – big ones are great for storing yarn, you can make nesting ones and hanging ones, I even have a small one on my desk for pens. I wrote this pattern for the hobbycraft blog last year and thought I’d share it here too for anyone who would like to make it.


How To Make An Easter Petal Basket
You Will Need:

2x balls of Conway + Bliss Odin in Lilac

8mm hook

Small amounts of Hayfield Bonus DK in green, yellow and white

Needle (for sewing in ends)

Stitch marker
How to make the basket:

Working with two strands of Debbie Bliss Odin at the same time:

Form a magic ring, 6dc into the ring and tighten (6)

2dc in each stitch (place a stitch marker into your first stitch, and for every round) (12)

1dc into first stitch, 2dc into the next stitch *dc, 2dc* until end of the round (18)

2dc into first stitch, dc into the next two stitches *2dc, dc, dc* until end of round (24)

*2dc, dc into next 3 stitches* (30)

dc in front loops only for the whole round (30)

Rounds 7-15: dc in every stitch (30) (Nb this is 9 rounds)

*dc, ch1, skip 1* repeat until end of round (30)

dc into every dc and ch space from previous round (30)

Slip stitch into next stitch, *skip 2, 7tr into next stitch, skip 2, slst* repeat until end of round (this forms the petal edge of the basket)

Finish off and weave in ends


To make the daisy garland:
Leaf 1: With Hayfield Bonus DK in green, ch8, then working down the chain into each chain stitch work the following: sk1, slst, dc, htr, tr, htr, dc then slst and ch1.

Working down the other side of the original ch8, now work: slst, dc, htr, tr, htr, dc, slst.

Now chain 108 stitches (this should comfortably go round the circumference of your basket – adjust as necessary). Once you’ve done this, put a safety pin or stitch marker through your last chain and then thread it through the holes in your basket made in round 16 until it comes back out at the start – make sure Leaf 1 remains at the start and doesn’t get threaded through.

Make Leaf 2 by following the Leaf 1 instructions on the last 8 chains you made.

Finish off and weave in ends.

To make the daisy – with yellow, 6dc in magic ring and tighten. Then 2dc into each stitch and fasten off (12).

Join the white yarn into any stitch from the previous round, ch4 then slst into next stitch, *slst, ch4, slst* until end of round (forms 6 chain petals).

*Slst into chain space of next petal, ch1 then htr, tr, htr, dc, (all in the same petal chain space) then slst into next stitch* repeat until end. (6 petals)

Sew the daisy onto the green leaf chain where the two ends meet above the leaves.

Happy making! I’d love to see any baskets you make so if you’re on Instagram feel free to tag me @holly_pips

Xx


Natural Dyeing Workshop

We popped to Lytes Cary last month which is a beautiful National Trust property, and I picked up a leaflet about their Contemporary Craft Weekend in partnership with Somerset Art Works. They were running a series of workshops and one in particular caught my eye – Practical Dyeing Workshop and Foraging Walk, with Flora Arbuthnott. I’d seen something similar on Countryfile recently (apparently I’ve reached that age where people watch it, or maybe it’s the move to the country…), and it sounded intriguing. Little did I know that it was actually Flora who had been on Countryfile!


Anyway the workshop was so popular that I ended up on a waiting list, but thankfully Flora decided to do two workshops so I quickly booked a place. Last Sunday I headed back to Lytes Cary for the workshop set in one of the rustic barns on the property. Flora had brought along her collection of dried and fresh flowers and talked us through the colours we could get using them, some of which were surprising. For example buddleia makes yellow! She taught us about mordants such as symplocos which helps brighten colours, and showed us her copper and iron solutions made from soaking metal in water and vinegar. We used silk, and bundle dyeing using steam to ensure we could make a dyed piece in the time we had.

I couldn’t resist buying some extra fabric to compare the delicate silk with the raw silk so I made two separate pieces. Firstly in the raw silk which is a bit thicker, I used hibiscus, buddleia, rose petals, symplocos and copper solution (basically a bit of everything, I couldn’t help myself!).


And for the more delicate silk I used onion skins, sunflowers seeds and madder, which is a root that produces a gorgeous red colour.

After tightly wrapping the bundles and putting them on to steam, Flora took us on a walk through the gardens where she talked us through both the wild and cultivated plants that could be used for dying. From ivy, to tree bark, berries, to nettles and docks roots, she is a font of knowledge! The foraging walk was a real eye opener and has inspired me to gather more from my garden.


So back to the dyeing….the thinner silk didn’t take as long so I unwrapped that one first, and I wasn’t disappointed, the colours were amazing! All from natural plants and flowers found in the garden! A beautiful mix of orange and purple.


My raw silk piece could not be more different but turned out equally as well – a combination of mustard yellow, green, purply-pinks and even a hint of blue, darkened slightly by the copper.

My raw silk piece is third from the left, and my other piece is next to it on the right

The ease with which you can use plants from the garden for this is amazing, and it is such a simple process when you know more about it. If you get the chance I’d highly recommend going to one of Flora’s workshops (she’s based in Bristol) or take a look at her website www.wilddyedgarden.co.uk – you’ll learn more from one of her workshops than you could learn from a pile of books on the subject. 


I’ll definitely be trying this again at home, and I’m going to be gathering up flowers and plants from my garden – jars of petals would look gorgeous on a shelf, and why waste them? Silk scarves would make lovely presents, and I’m thinking of turning the raw silk I dyed into some lavender bags for Christmas gifts.

Xx

HiyaHiya Crochet Hooks – Review

The lovely team from HiyaHiya Europe recently got in touch with me and asked if I would like to review some of their hooks – I’d seen them popping up on various websites but hadn’t actually tried them myself so this sounded perfect!

I regularly use all size hooks so they kindly sent me a 1.5mm, a 5mm and a 12mm – and I was immediately drawn to the 12mm – it’s sparkly! And purple! Truly gorgeous to look at, and as it turns out, really nice to work with. It’s acrylic so it’s lightweight, really smooth to use and glides easily through your work. I tested it out on some t-shirt yarn and whipped up this little hook pot, and I can honestly say it was a delight to work with – and did I mention it’s sparkly!😉✨💜

Next up I thought I’d give the 1.5mm a go….a bit daunting as it’s so teeny, but using 2 strands of embroidery thread I worked up this tiny granny square! I thought it would be quite tricky but the hook was really smooth to use. This would be perfect for adding a delicate lacy edge to a project like a tea towel or child’s clothing. (That’s a 10p coin there for scale)


Last but not least I gave the aluminium 5mm hook a go. Because it’s aluminium it’s very lightweight – I used it with some denim tape which isn’t always easy to work with but the hook made it simple (and now I want to make a whole bunch of these little denim stars!)


I should point out that I’ve not been paid to advertise these – HiyaHiya just sent me some hooks and asked for an honest review which I’m always happy to give. These hooks were really nice to work with and I’ll definitely consider them should I need more hooks in future – and the sparkly one would make a brilliant stocking filler (yes I’m already starting to think about Christmas!🙈🎄)

Yarn review 

‘Holly would you like to review some yarn for us?’……they had me at yarn! 

When Hobbycraft’s Knitcraft team got in touch and asked if I wanted to try out some new yarn how could I resist? (I’m pretty sure no one says no to this!)

So when a lovely squishy parcel arrived I couldn’t wait to dive in – these three yarns vary greatly, and it was nice to try something different to my usual go-to yarns. I’ve written a quick review below if you want to hear more…

(This isn’t an ad, I’ve not been paid for this but they did send me squishy yarn to play with 😉)


Phildar Myriade:

This is a fabulously glittery yarn! The loose chain of this yarn is easy to work with, isn’t splitty and not scratchy like some metallic yarns. It would be perfect for adding a bit of sparkle to an outfit with a glitzy trim, and it’s ideal for Christmas decorations!

Phil Flocon:

This is a gorgeous chunky yarn to work with – its fluffy texture is perfect for garments and the glacon shade is a beautiful icy green. It’s really soft due to the alpaca content…im envisioning a winter cowl with this lovely snuggly yarn!

Phil Nuage Legrete
This chunky yarn is a gorgeous blend of merino (72%) and polyamide, making it lovely and soft. It’s really snuggly but light at the same time – it’s like crocheting a cloud! The sable shade is a great neutral, I’d really recommend giving this yarn a try.

African Flower Blanket 🌸

I love crocheting African Flowers – they’re such a pretty design, and I’ve made a whole host of Heidi Bears designs using them – they’re also quick and easy to make in batches. 

My latest blanket is destined for a new baby girl, and they wanted something in pale grey, pink and white – we added in a pale yellow too as I find this design works best with four colours.

I used Paintbox Yarns Simply Aran yarn in Stormy Grey (4 balls), Blush Pink, Banana Cream, and Paper White (1.5 balls of each).

As the blanket is 6×6 squares I made them in batches of 6 at a time, with each group having a different colour combo in the middle/petals. By doing them in batches I managed to get this whole blanket completed in 2 weeks – a good job too as the baby has arrived!


If you’re looking for a good pattern to square off your African Flowers I can recommend this Made in K-Town blog post.

I didn’t get time to measure it before it was collected but it came out roughly 1 metre square and was lovely and cosy due to the Aran thickness.


For the joining I used a flat slip stitch join which have a nice neat finish. I went down a hook size to do the border (I used 5mm for the squares and then a 4.5mm for the border) which was made up of a row of double crochet (sc if you’re using US terms) but making htr’s (hdc) into the point where the squares join. I then followed this with a round of htr in the back loops only, of white, then yellow, then pink.

Anyway here’s hoping it is very loved in its new home, and keeps baby V all warm and snuggly….